
【笔记】在 Blazor WebAssembly Hosted 中使用 Identity
记录了一些 Blazor WebAssembly 的基础知识和在其中使用 Identity 进行身份验证的知识点。好久不写博客了,手都生了。
注:本文中使用的 .NET 版本为 .NET 5.0(.NET Core 和 .NET Framework 合并的版本)
什么是 WebAssembly
顾名思义,WebAssembly(wasm)是一种实验性的 Web 低级编程语言,应用于浏览器的客户端,以提供比 JavaScript 更快速的便宜和运行。并允许开发者将自己喜欢的编程语言编译成 wasm 后在客户浏览器内以接近原生的性能运行。打破前端只有 JavaScript 的桎梏,让各种“后端”语言走上前台,走进用户的浏览器。
WebAssembly 由 W3C 发起,由 Mozilla,Google,Microsoft,Apple 分别代表四大浏览器牵头,从2017年起开始实验性支持。最终在 2019 年 12 月被 W3C 推荐,成为 Web 的第四种语言。
什么是 Blazor
Blazor 是 .NET 社区的 Web 应用解决方案,名字取自 Browser + Razor 之意,以 C# 和 HTML 创建 Web 应用。
Blazor 分为 Blazor Server 和 Blazor WebAssembly。Blazor Server 指托管于 Asp.Net Core 的服务器上的瘦客户端。绝大多数操作在服务器端进行,客户端指挥下载所需要的最小化的页面,并通过 SignalR 的连接更新浏览器中的界面。Blazor WebAssembly 是基于 wasm 的单页应用。初始加载内容远大于 Blazor Server,但之后的处理过程将在客户端硬件内完成,所以它具有更快的响应速度。
Blazor WebAssembly Hosted 是 Blazor WebAssembly with Asp.Net Core Hosted 架构的简称。他是由交给客户的 Blazor WebAssembly 作为前端应用,同时后端由 Asp.Net Core Api 进行数据交换的一种结构。
使用 Identity 进行身份验证
新建项目
.NET 官方推荐的身份验证方法是通过 Microsoft.AspNetCore.Identity 和 Identity Server 4 配合 Jwt 来进行用户身份的验证。
新建工程时,将身份验证和 Asp.Net Core Hosted 正确配置:
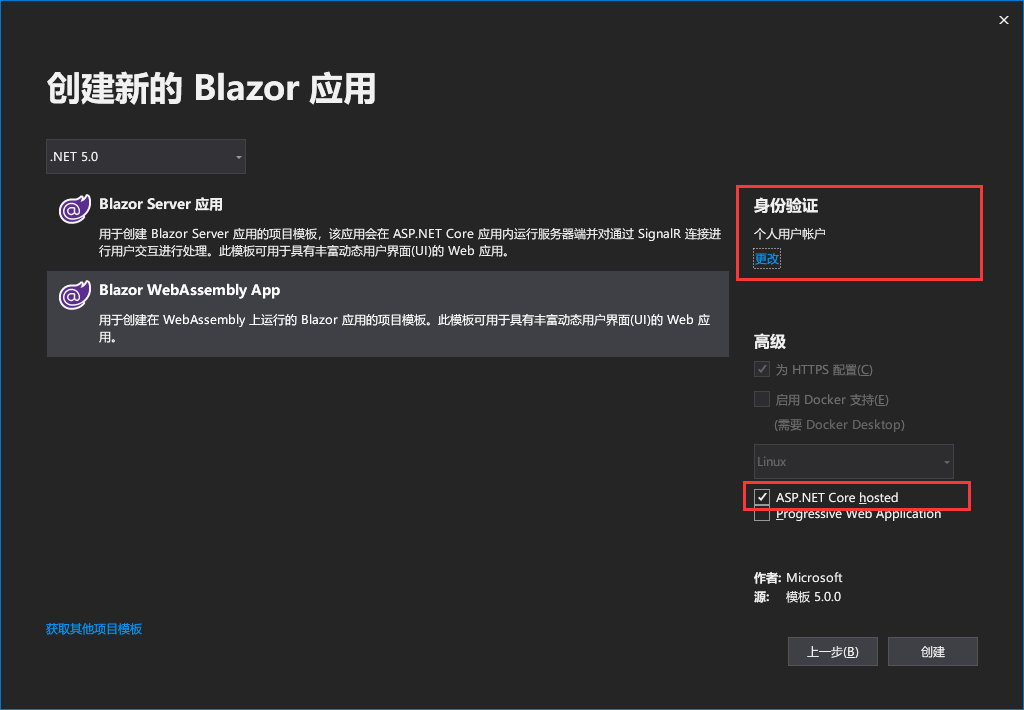
重建数据库上下文
等待示例工程创建完毕之后,可以看到 Solution 中被分成了三个项目。分别是盛放 Blazor WebAssembly 的 Client 项目,盛放 Asp.Net Core 服务器的 Server 项目以及两个项目之间互相通信的共享项目 Shared。
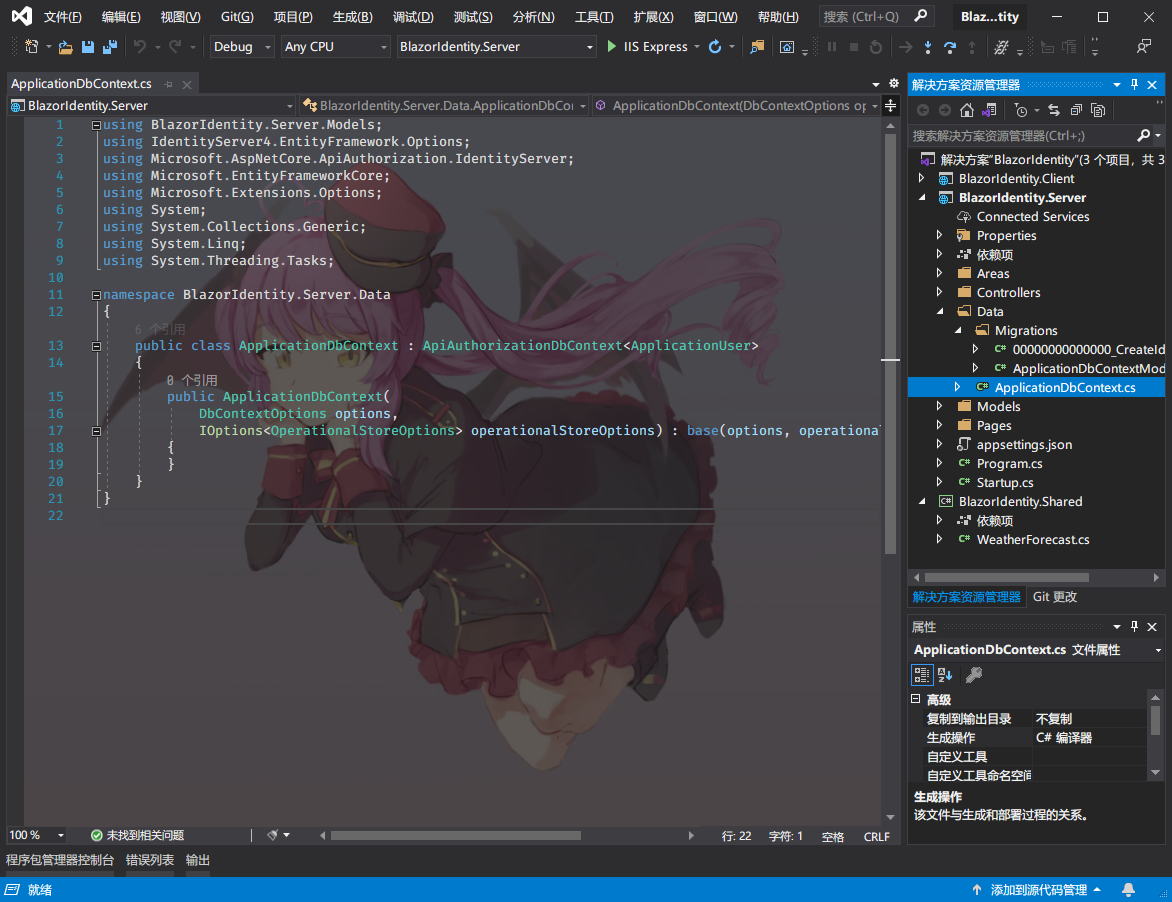
其中,Server 项目中已经写好了默认的用户类、数据库上下文类以及数据库初始化 Migration。默认情况下,Entity Framewok Core 使用的数据库是 SQL Server LocalDB。虽然我更偏好 SQLite,但其实只是换一个 NuGet 包和连接字符串的事,所以等到下次杂项的时候在提,这次先用 LocalDB 凑合。
删除Server/Data/Migrations文件夹,在选中 Server 项目的情况下打开 工具 - NuGet 包管理器 - 程序包管理器控制台(或使用 Ctrl + `打开),使用以下指令重新建立 Migration 和数据库:
1
2
| Add-Migration InitCreate -o Data/Migrations
Update-Database
|
或者,如果你使用的是 .NET Core CLI:
1
2
| dotnet ef migrations add InitCreate -o Data/Migrations
dotnet ef database update
|
通过基架创建 Identity 所需的 Remote Pages
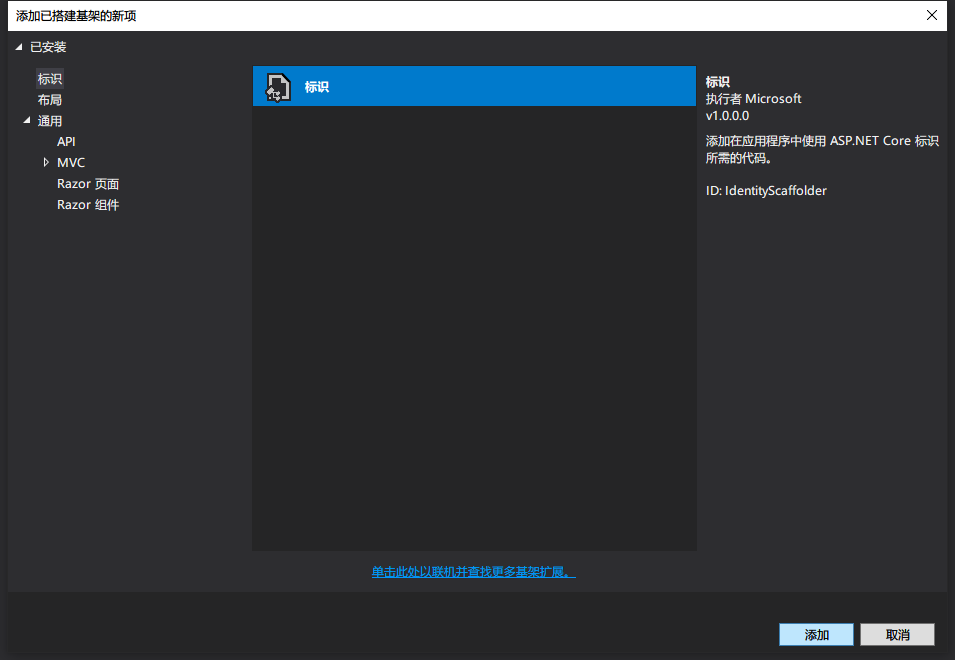
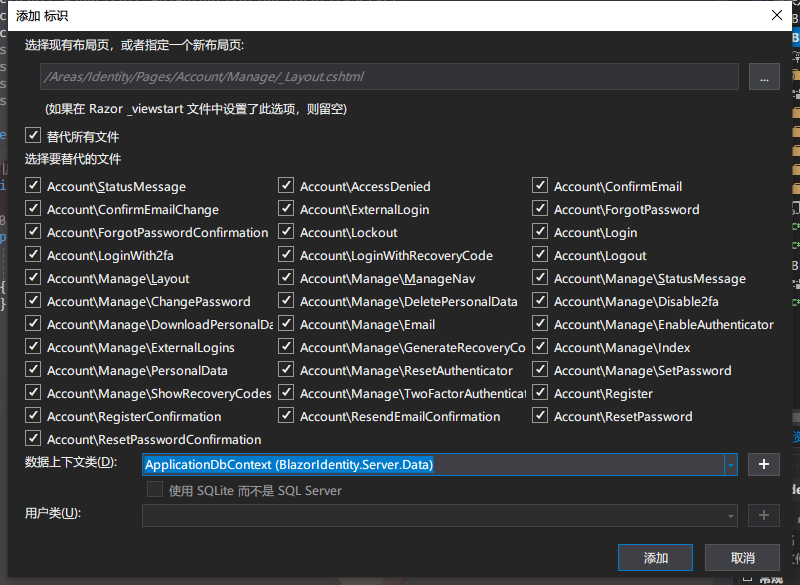
如果不创建基架,Identity 模块的 <RemoteAuthenticatorView> 控件连接到的界面都会使用默认的页面。通过基架将所有的页面创建后,就可以通过修改cshtml文件来对逻辑和界面进行自定义。
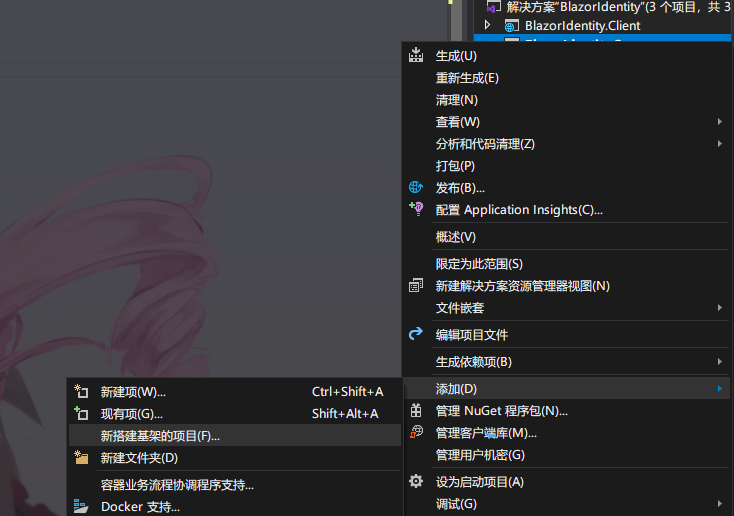
从 Server 项目的新建菜单中新建基架项目,选择 Identity 并指定数据库上下文类,接着替换全部(不得不说巨硬的这个机翻属实不行,Identity 都能翻译成标识)。
使用基于 Role 的身份验证
基于默认设置,Jwt 口令中是没有 Role 相关信息的。我们需要让服务器发出的 Jwt 口令中带上 Role 信息:
1
2
3
4
5
6
7
8
9
10
11
12
13
14
15
16
17
18
|
services.AddDefaultIdentity<ApplicationUser>()
.AddRoles<IdentityRole>()
.AddEntityFrameworkStores<ApplicationDbContext>();
services.AddIdentityServer(options => options.IssuerUri = Configuration.GetValue<string>(Literal.Domain))
.AddApiAuthorization<AppUser, ApplicationDbContext>(options =>
{
options.IdentityResources["openid"].UserClaims.Add("role");
options.ApiResources.Single().UserClaims.Add("role");
});
JwtSecurityTokenHandler.DefaultInboundClaimTypeMap.Remove("role");
services.AddAuthentication()
.AddIdentityServerJwt();
|
坑爹的一点是,当用户只有一个 Role 的时候,Claims 中的信息为:
当用户有不止一个 Role 的时候,Claims 中的信息为:
1
2
3
| {
"role": ["Admin", "Operator"]
}
|
但!我们亲爱的 Blazor 端的 ClaimsPrincipal.IsInRole()函数和[Authorize(Roles = "")]属性以及<AuthorizeView Roles="">控件都是通过直接判断字符串是否相等来判断用户是否在 Role 内。
我暴怒,这个问题困扰了我好几天的时间。但在 Github Issue 中,Blazor 的 Contributor 竟然说这是 a Feature !
对此,我们需要手动 Hack 一下客户端内的 AccountClaimsPrincipalFactory,创建如下子类:
1
2
3
4
5
6
7
8
9
10
11
12
13
14
15
16
17
18
19
20
21
22
23
24
25
26
27
28
|
public class RolesAccountClaimsPrincipalFactory
: AccountClaimsPrincipalFactory<RemoteUserAccount>
{
public RolesAccountClaimsPrincipalFactory(IAccessTokenProviderAccessor accessor) : base(accessor) { }
public override ValueTask<ClaimsPrincipal> CreateUserAsync(RemoteUserAccount account,
RemoteAuthenticationUserOptions options)
{
var roles = account?.AdditionalProperties["role"] as JsonElement?;
if (roles?.ValueKind == JsonValueKind.Array)
{
account.AdditionalProperties.Remove("role");
var claimsPrincipal = base.CreateUserAsync(account, options).Result;
foreach (var ele in roles.Value.EnumerateArray())
{
(claimsPrincipal.Identity as ClaimsIdentity)
.AddClaim(new Claim("role", ele.GetString()));
}
return new ValueTask<ClaimsPrincipal>(claimsPrincipal);
}
return base.CreateUserAsync(account, options);
}
}
|
并在 Client 端的 Program.cs 注册中间件:
1
2
3
4
5
6
|
builder.Services.AddScoped(typeof(AccountClaimsPrincipalFactory<RemoteUserAccount>),
typeof(RolesAccountClaimsPrincipalFactory));
builder.Services.AddApiAuthorization();
|
只能说,希望这个 Feature 能早日被定性成 Bug。
自定义
然后就是自由发挥的时刻了。
通过中间件自定义账户规则:
1
2
3
4
5
6
7
8
9
10
11
12
13
14
15
16
17
|
services
.AddDefaultIdentity<ApplicationUser>(options =>
{
options.SignIn.RequireConfirmedAccount = false;
options.Password.RequiredLength = 6;
options.Password.RequiredUniqueChars = 2;
options.Password.RequireNonAlphanumeric = false;
options.User.AllowedUserNameCharacters = string.Empty;
options.User.RequireUniqueEmail = true;
})
.AddUserValidator<UserNameValidator<ApplicationUser>>()
.AddRoles<IdentityRole>()
.AddEntityFrameworkStores<ApplicationDbContext>();
|
自定义登录加载页面(通过提供 Render Fragment 参数):
1
2
3
4
5
6
7
8
9
10
11
12
13
14
15
16
17
18
19
20
21
22
23
24
25
26
27
28
29
30
31
32
33
34
35
36
37
38
39
|
@page "/authentication/{Action}"
@using Microsoft.AspNetCore.Components.WebAssembly.Authentication
<RemoteAuthenticatorView Action="@Action" >
<CompletingLoggingIn>
<Loading LoadingMessage="@LocalStrings.LoadMessage.CompletingLogin"></Loading>
</CompletingLoggingIn>
<CompletingLogOut>
<Loading LoadingMessage="@LocalStrings.LoadMessage.CompletingLogout"></Loading>
</CompletingLogOut>
<LoggingIn>
<Loading LoadingMessage="@LocalStrings.LoadMessage.LoggingIn"></Loading>
</LoggingIn>
<LogInFailed>
<ErrorComponent ErrorTitle="@LocalStrings.Error.BadRequest400" ErrorContent="@LocalStrings.Error.LoginFailed"></ErrorComponent>
</LogInFailed>
<LogOut>
<Loading LoadingMessage="@LocalStrings.LoadMessage.LogOut"></Loading>
</LogOut>
<LogOutFailed>
<ErrorComponent ErrorTitle="@LocalStrings.Error.BadRequest400" ErrorContent="@LocalStrings.Error.LogOutFailed"></ErrorComponent>
</LogOutFailed>
<LogOutSucceeded>
<RedirectToHome></RedirectToHome>
</LogOutSucceeded>
<Registering>
<Loading LoadingMessage="@LocalStrings.LoadMessage.Registering"></Loading>
</Registering>
<UserProfile>
<Loading LoadingMessage="@LocalStrings.LoadMessage.LoadingUserProfile"></Loading>
</UserProfile>
</RemoteAuthenticatorView>
@code
{
[Parameter] public string Action { get; set; }
}
|
参考资料


